Teacher’s Good Graces Apple Spell

Anyone who’s taken a class with a large amount of students knows that sometimes you’re just a pile of things to grade to that teacher and not actually a person or face attached to that name/grade. I doubt that’s as much of an issue right now since the education systems had to adapt to current (pandemic) times.

I was recently going through a massive shoebox-thick stack of papers and discovered some notes I made about this spell during college. (I was deciding if certain apple types were better than others – the answer is maybe yes, a sweeter apple gives ever-so-slightly better results.) I mentally named it “Apple Teacher Friendship Spell” but that’s not what it is.

This spell’s purpose is to make you known to your teacher or professor in a positive way. It means that you’re starting off with a bit of a boost because they’ll think kindly of you. Will it give you a better grade? Maybe. I suppose it depends on how your teacher grades and how much their emotional states play into the grading itself.

It’s a pretty simple spell, so most broke college students can scrape together the coin to make this spell happen.

What you’ll need:

  • An apple (sweeter varieties are slightly better, but just get an apple you’ll eat. Bonus: if you can get one from your school’s cafeteria, even better.)
  • Your teacher’s names, spelled correctly.
  • A knife or something to carve with
  • Honey, caramel, or other sweet fruit dip
  • A bag you’ll carry to class (see below)
  • Plate, bowl, small cup (optional)

This spell ideally should be cast before you start class. However, sometimes that’s not possible or you’re on the fence about taking the course at all. You can cast the spell after you’ve met the teacher, but try to do it within the first few times you’ve met them.

Acquire an apple. Sweeter varieties have tested slightly better than sour or tart varieties, but just get an apple you’ll eat. (The eating part is important for this spell). If you can get an apple from your school’s cafeteria, then that’s even better.

Get some sort of sweet fruit dip. Caramel is a classic choice, honey, sweet or chocolate hummus, or just a sprinkle of cinnamon and sugar are also good. The dip itself isn’t important so much the process of coating the apple’s flesh with something sweet then eating it. Pick what’ll taste good, so long as it has a bit of sugar in it.

Buff the apple’s skin while thinking or speaking aloud of how you want to be treated in general by these teachers. Do they know your name? Do they ask you to speak in front of the class or do they ask favors from you? Do they grade you well? Do they ask how you are and genuinely care about the answer? Do they notice if you’re missing from class or if you’ve been acting out of sorts? Think on how you want to be treated and express that.

Once ready, slice the apple into as many slices as you have teachers. If you have six teachers, then you’ll need six slices. Ideally, they should be the same size, but don’t worry if they’re not.

Save the apple seeds! Set them aside on a plate or dish of some kind and let them dry out completely. Turn them over occasionally to make sure they dry on both sides.

Now on one side of the slice, carve into the apple your teacher’s name including any title they have. If the name is too long, you can use initials, but it’s better if you can carve the whole name out. Each apple slice should have the name of a different teacher.

Once you’ve gotten your apple slices carved, dip the apple as much as you can into your apple dip and eat the slices.

When the apple seeds have fully dried, put them in a little charm bag. This charm bag should be carried every time you go to class or school. You can also put the seeds in your pencil case or in a pocket of your school bag if you don’t want to make a charm bag.

Notes:

  • Buffing an apple is done by using a piece of cloth (kitchen towel, shirt, etc) and rubbing the apple’s skin to promote a shininess to the skin. Don’t press too hard as you might bruise softer apple varieties. Some apples don’t buff to a shine well and that’s okay. It’s just the act of buffing the apple that’s more important than the shiny factor.
  • Making a charm bag for classes is a really good idea for students. Add the seeds to dried herbs and crystals that promote your studies, concentration, and serenity.
  • This spell can be done even if you’ve never met your teacher and you’re doing classes online. The only change I’d suggest is that you keep the apple seeds in a glass jar next to your computer or studying area.


Patreon | thiscrookedcrown.com

Advertisements
Advertisements
Advertisements
Advertisements
Advertisements


Scarecrow Harvest Protection Spell

Anyone who grows a garden has struggled with pests and thieves. It could be squirrels digging up your plants, birds plucking your berries, rabbits nibbling on the cabbage, deer grazing on your flowers, neighbors stealing your dear pumpkins, or spirits eating the essence of the peppers. (Is that last one a problem for other people or just me?)

This spell is is best used for growing rows of plants in the ground, but it can be used even in a small pot.

What you’ll need:

  • A scarecrow vessel (see below)
  • Soil from the plants you’re protecting (see below)
  • Juniper leaf
  • Garlic clove
  • Onion
  • Rose petals
  • Rose thorns
  • Rosemary
  • Water (see notes)

First, make or buy a scarecrow. Ideally, the scarecrow would be made of juniper, but it can be anything. It doesn’t even have to be a scarecrow. It could be a garden statue or pinwheel, but scarecrows (and similar) do help keep pets away in a mundane fashion.

Next, make a potion. In a large jar, bowl, pot, or cauldron, fill it up halfway with water. Put the juniper leaves, garlic, onion, rose petals, rose thorns, and rosemary in it. As you put them in, think or say out loud what you want to protect and what you want to protect it from.

Cover the jar and let it sit for twenty-four hours. It may be best to put it outside in the garden if you can. It may not smell great.

Alternatively, you can heat the water if you want and put the juniper leaves, garlic, onion, rose, and rosemary in it. Remember to enchant the water as you work. Let it sit and steep for an hour.

When the potion is done, strain out the ingredients and save the water. You can toss the used ingredients in your compost pile or bury them outside of your garden space.

Next go to each corner of your garden plot and collect a bit of soil. If you’re using a round plot or a pot, just take a bit of soil from the edge of the circle.

Once you have the soil, rub it over the scarecrow. Then wash the soil away with half of the potion. Use only the half of the remaining half, sprinkle a bit in the places you took the soil from.

Now place the scarecrow where you want it to go and use the last of the potion to sprinkle over it. Tell the scarecrow that you want it to protect the garden.

Notes:

  • The water can be any kind. Water from whatever source you water your plants from is good. Water purified by the sun or the moon (sun or moon water) or holy or sacred water is also great.


Patreon | thiscrookedcrown.com

Advertisements
Advertisements
Advertisements
Advertisements
Advertisements


Magical Gardening Tips for Complete Beginners

Witches and plants go hand in hand. (Generally, of course. I’m not the boss of your craft, but, you know, it’s generally a thing.)

But gardening is expensive. So expensive. You wouldn’t think nature, the thing we live on, in, around, and with would be difficult to acquire, but it is. You can easily drop hundreds if not thousands of dollars a year on gardening – just indoor gardening. Never mind external gardens.

And witchy plants? SO MUCH MORE EXPENSIVE. Either you need to safely wildcraft them (and some of those plants shouldn’t be removed from their environment if you aren’t 1000% sure you can handle them, because the plants need all the propagation opportunities possible) or you buy those plants. Buying seeds can be a few bucks here and a few bucks there, but there’s always a good chance that your plant won’t grow. Then you’re out a few bucks and all you have is a jar of failed dirt. Buying live plants is a better middle ground, but plants do experience trauma so you still have a risk of them dying.

Aside from the expense of the actual plants, you may need to purchase soil, soil additives (because soil is not the same everywhere and some plants are unhappy without certain soil), pots and planters, plant trays and moving wheeled platforms for larger pots, plant food, and possibly plant lights or a water system. That’s for indoor plants. Outdoors? That’s a whole different expensive level. 

So, here’s some witchy truths and tips for indoor gardens.

True Facts

  • You will fail. Plants will die. You may feel like a murderer. It happens to us all.
  • Google plant care for your plant. It may just save your plant’s life.
  • Ask fellow gardeners and witches for advice. This is something all of us do in regards to plants so many are quite happy to talk about it.
  • It’s better to have one healthy plant than six unhealthy plants.
  • Plants do not always smell good. Some plants smell like ass and others will smell like death, piss, or onions. The prize may outweigh the cost, but not always. 
  • You will have bugs. Even indoors, there will be bugs.
  • Sometimes the organic or better quality stuff isn’t best. Think before you buy stuff for your garden. You organic soil may sprout mushrooms that kill your plants (true story) and you may find that a clear vase of water with a handful of rocks is better for a plant than a specific growing pot. Trial and error helps here, but don’t sink a ton of money on something without trying to more common stuff first.
  • Many, many, many plants are invasive. Mugwort, mullein, chamomile, and mint are common invasive plants used in witchcraft. I recommend googling before purchasing or at least googling before planting in the ground for all plants. Some plants spread like crazy and will destroy your garden if giving the chance. 
  • Annual means that it grows for less than two years and will need to be replaced, most lasting a single season. Perennial means it comes back again and again. Some perennials self-sow so you may get a perennial plant to come back, just not the same plant as before.
  • Keep an eye on how warm your plants can get. Too much heat will kill them, but so will too much cold. It may be best to put a plant on a table near a window than in a cold window sill, even if the window gets better light. 
  • Not all plants are pet-friendly. Google may tell you if a plant is toxic to animals, but a better bet is to just keep them out of a pet’s range.
  • Plants do weird shit. Expect to be surprised.

Where to get your plants

  • Grow from seeds
  • Get a cutting or live plant from a friend
  • Grow them from kitchen scraps
  • Buy a live plant at a store or nursery (online or local)
  • Wildcraft one (so long as the population of said plant is super stable)
  • Check the clearance section of a store or nursery 

I’ll be honest. I normally search the clearance section of stores first for plants to rescue. Normally these are plants that are growing weirdly, need transplanting desperately, or simply look unhealthy. And they may be all of that! But they’re usually really cheap so I tend to rescue them first and foremost.

I can, have, and do grow plants from seeds. I usually keep my plant purchases to a minimum from seeds, merely because I don’t have space to give lots of plants a head-start indoors. (Most of my growing space is a single large window where all the indoor plants live during the cooler months). I normally harvest seeds from foods I’ve consumed (like avocado or lemons), but I also buy seeds from Baker’s Creek (rareseeds.com). They sell heirloom vegetables seeds as well as flower and herb seeds.

My favorite (and cheapest) suggestion is to grow plants from fruits and vegetables you already have purchased. I’ve gotten ginger, scallions (green onions), potatoes, sweet potatoes, celery, garlic, and pineapples from kitchen scraps. Root vegetables and plants with bases like celery are easier to re-grow, in my opinion. A quick google search of ‘food you can re-grow from kitchen scraps’ will yield good results. 

Some of my best plants I get from nurseries. Yup, they’re more expensive (but not much more, to be honest, then home improvement stores), but they’re way happier plants. And you can get some beautiful selections you might not get elsewhere. Plus, you’re supporting a local small business, which is always a good thing to do. Two years ago, my household scored black petunias (actually a very dark purple) at a nursery whereas we had never seen them before. My preferred nursery is owned and operated by a single woman and conveniently is a few houses down from my preferred farmer’s market. I just have to remember to grab some bug spray before going and I’m a happy witch.

I rarely get plants in other ways. I sometimes will transplant a wild plant to save it from becoming someone’s lawn clippings (like I did with my bittersweet nightshade) and I’ve gotten plants from other people, but largely, I acquire my plants in the above ways right now.

Planting and grow your plants

Following your plant’s care recommendations, provided by google, is best. Seriously. Each plant will require a learning curve. 

My favorite pots for growing are a large clear glass jar and some cheap clay pots. I do have plastic ones, but I tend to only use them for very, very large plants. Ceramic pots are great too and I use them often. I skip concrete planters – they’re very heavy and I’ve had them crack in the New England cold winters. Who knew? Most of the time though, you’ll find a lot of my water-based plants growing in recycled olive or jam jars. I love the eclectic look of the different pots and jars, but if you like things more streamline and uniform, pick something that’s netural and available widely in a variety of sizes.

You can also use a double pot system. Plant your plant in something that might not be pretty, but you can place inside something that is pretty. I do this with plants that haven’t outgrown the pots they come in. Grow pots are cheap plastic and aren’t great, but sometimes moving a plant isn’t the best idea. I often just leave plants alone until they need some attention. I’ve done best at keeping things alive when I work in this manner.

I use decent but not stellar soil for my indoor plants (and I skip the organic stuff after a mushroom episode). I use dollar stone china plates for the bottom of my planters when I can’t find a real one to fit. Driveway gravel is great for draining rocks for the bottom of my planters, but it can be a bit sharp for some delicate rooted plants.. I dig using my hands and end up with dirt everywhere. I water as needed (unless the plants are liars) and feed them as often as I dare.

Working outdoors is a whole different game. There I have shovels, trowels, work gloves, clippers, shears, scissors, ladders, and every other thing under the sun. I use decent soil to bolster the land as needed or dive for gardening tomes to help balance the PH in the soil. I use mulch and large brim hats and consider the merits of growing compost and curse my yard’s poor dirt.

How I set up my pots generally follows like this:

  1. I pick a pot about slightly less than twice the size of the pot the plant currently is in. If it’s a seed, then I use a very small pot about six inches tall and three inches wide. If the plant is very root bound (as in the roots are all tangled together inside the pot), I’ll upgrade to a larger pot.
  2. I put a small layer of driveway gravel at the bottom of the pot. This is so the water doesn’t sit on the roots or soak the soil too much. If your pot has holes at the bottom (and you have a plant liner tray) then you can skip this step, but I generally always use the gravel. The gravel is somewhat pointy so be aware that it may damage very tender roots, so handle with care. I add more gravel if I’m planting something that needs drier soil, like a succulent or cactus. Some water plants are anchored by gravel and use smaller rocks for additional root assistance.
  3. Then I put a little soil in, just enough to cover the rocks (or more if the plant is short but deep roots or it’s a seed)
  4. I pull the plant out of the pot it’s already in, shaking some of the soil from the roots. If the plant is a seed, just plop it in the soil and plant according to recommendations. If it’s very root bound, you may end up spending several minutes loosening up the soil between the roots so the plant can have more room to grow. Be careful not to break the roots or any stems when handling the plant. Be gentle.
  5. Then I pad the sides of the plant with soil, layering on more and more until the roots are completely covered and the plant is well secured.
  6. Sometimes I add rocks at the top, but that’s largely depending on how much I want or need to protect the plant from soil erosion by water. 
  7. Then I drizzle water on the plant until the soil is wet. Finally, the plant can be placed happily in where I want it to go. I’ll add watering and feeding times to my calendar, as suggested by plant growing guides, and call it a day. 

Planting Outside

I won’t cover planting outside right now, because it’s a super large topic and the advice will vary depending on soil type, weather, climate, sun/shade ratios, wind, what’s already growing, wildlife, and how much time you have to devote to it all.

My general advice for outdoor gardeners is to do a soil test, then you’ll have a general idea how much work you’ll need to do to adjust to plants. That being said, it may be easier for you to simply grow in containers than in the ground, especially if there’s a lot of trees, roots, shade, or something buried in the ground, like a septic tank.

Take photos and notes of the areas you want to grow in for at least a week at various times of the day. I just leave a little notebook in the window closest to that area and take notes and a photo every time I walk by. This will help you determine how much sun, wind, and shade that area gets at various times of the day. It also may tell you what wildlife is nearby.

Armed with that information, you can start planning a garden. Again, this is a huge topic, but I typically suggest raised beds, because they’re just so much easier to take care of and work with.

Now, if you have specific plants you want to grow in a specific area, then do a test. I plant my desired plant in a container and place it in a spot where I’d like to plant it in the ground in the future. It helps determine whether or not the plant will survive there. There’s no guarantee even if all this is done. Some plants just don’t do well in certain soils. You’ll have to risk failure to succeed.

You’ll also want to keep in mind how much a plant will grow and how invasive it’ll be. Mint, for example, grows easily in containers, but shouldn’t be planted in the ground or it’ll take over the whole yard. Ground cover can be useful, but sometimes it’s impossible to get rid of later and becomes a nightmare. Do your research before you plant something with a reputation of being invasive in this manner.

Adding some magic

Magic can be added to any part of the routine.

When selecting plants, I seek out the ones that are calling for help or seem to want me specifically. I listen to what the plant wants and that’s how I get many of my plants to do well. This is an animist’s point of view, of course, but I find that it really works well.

You can plant by the phases of the moon and some people do really well with it. I have a theory that if you have a lot of water on the property, planting by the moon works better, but I don’t have near enough data to really propose this seriously right now.

Water can be enchanted with the power of the sun or moon. You can also used infused water, like a tea or water from making pasta to water plants with. This will largely depend on the plant itself. For example, I use nothing but clear, clean filtered or purified water for my indoor bamboo. If I use anything else at all, it dies rapidly and it very difficult to save. Google will, yet again, be your friend.

What you fertilize your plants with can also be enchanted. Rose, according to some gardeners, like calcium so planting a hank of your hair alongside your roses is good for them. I’ve tried eggshells, but I didn’t notice any changes with my rose bush, but I think that’s largely due to the location rather than the plant itself. Once you figure out what weird things you can fertilize your plants with, the magical connections should come quickly after that.

Of course, you can additionally enchant the soil you plant in with enchanted water, carefully made compost, or enchanted draining rocks with sigils painted on them in environmentally friendly paint.

Pots are probably the easiest to enchant. You can draw or paint with environmentally safe paint on the outside and inside of the plant to encourage grow and health in the plant. This can be as simple as a sigil or written word or as complicated as an intricate painting. The choice is yours.

Placing decorations inside the pot is also useful. This can be done by placing a tiny statue in the pot with the plant in a manner where the plant won’t be crowded. I’m plotting to turn the soil around my palm plant into a tiny fairy cottage, lacing each item I acquire or make with spells for prosperity, abundance, and household happiness and health.

There are many other ways to enchant your gardening too. Garden tools can be enchanted for strength and to be rust-proof. Gloves can be enchanting to keep the hands safe. Support for plants can be soaked in enchanted water.

Don’t forget that you can simply verbalize spells by talking to your plants. There’s some research to support that plants like being talked to nicely and sweetly and that backs up my experience nicely. (The only plant I ever struggle with is a climbing rose I’ve named Diva and she’s the most prickly thing I’ve ever met. She gets me every time, no matter what I’m doing.) I like to hum or sing-song to my plants as I work on them, if I’m not just straight-out having a one-sided conversation with them. I get some strange looks, especially from my brother, but I don’t mind.

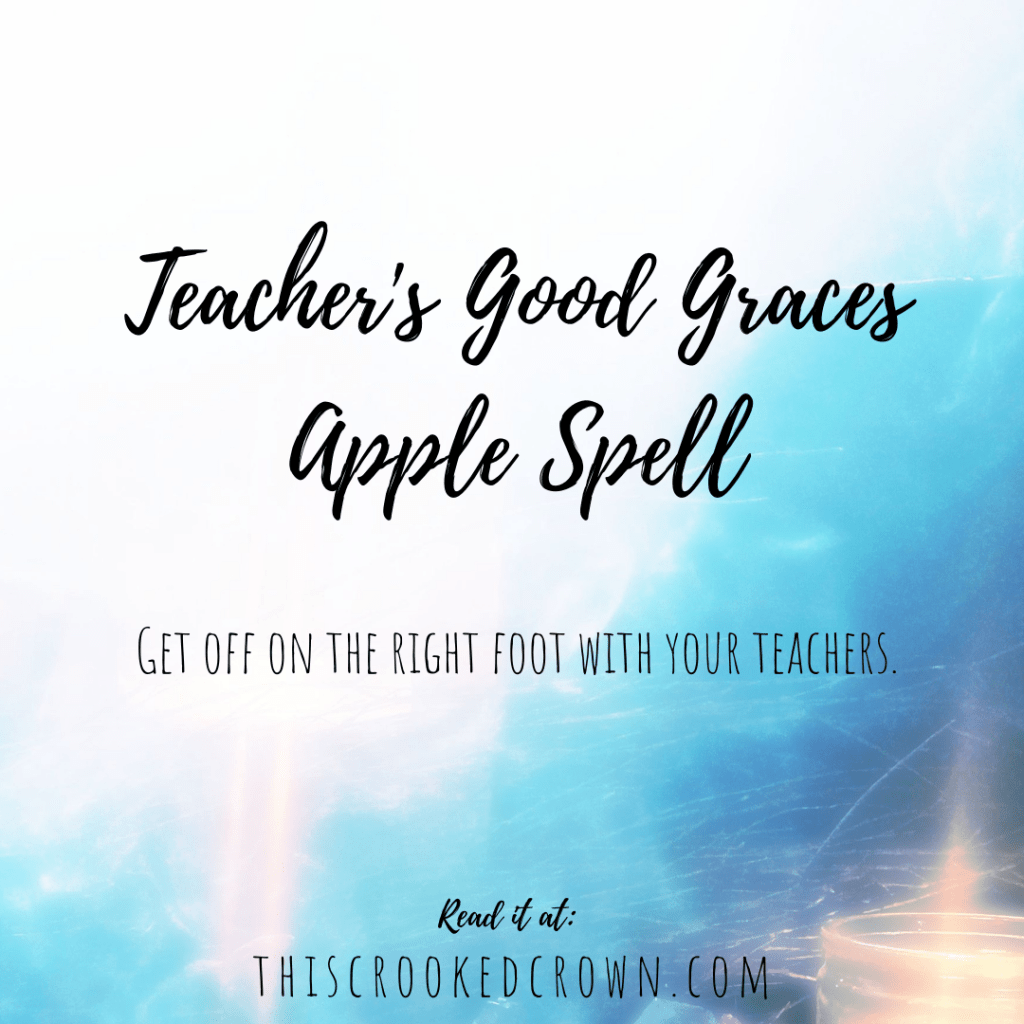
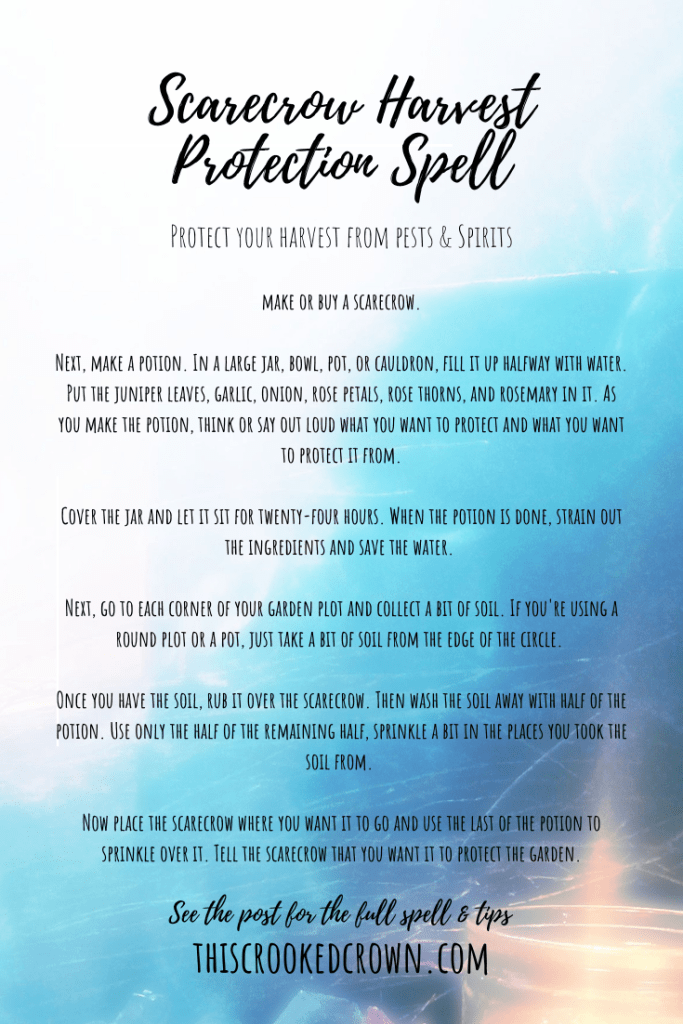
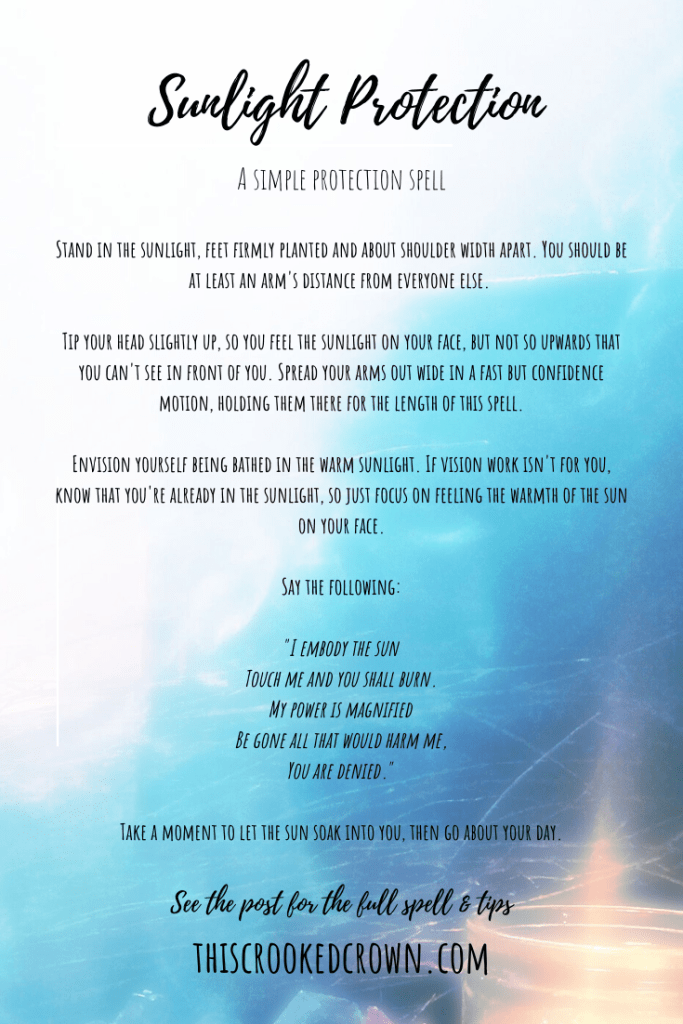
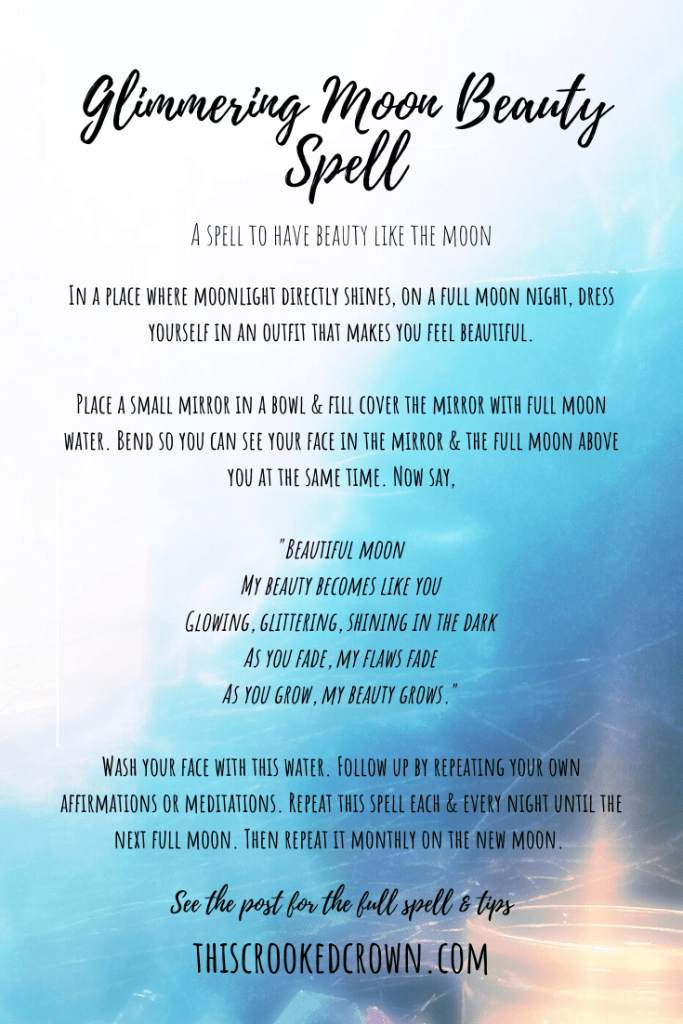
Those are some basic tips! Hope it helps!


Patreon | thiscrookedcrown.com

Advertisements
Advertisements
Advertisements
Advertisements
Advertisements


Sunshine Protection

This is a general all-purpose protection spell. It can be cast to keep spirits out, to lessen the chances of creeps talking to you, and other general helpful protection things.

Quick verbal charms are some of my personal favorite spells. I use them pretty much daily in my own practice. This is one I wrote specifically for my own use. It’s best used on bright, sunny days where the light feels strong and warm.

This is both a targeted and location based spell. When you cast it, you’re essentially making a magic circle. Anything inside the circle, including the land itself, will also be enchanted. So that piece of land, everything you’re wearing and carrying (especially whatever the sunlight touches), as well as yourself will carry the protection spell.

It also has something of a side effect – it can boost confidence, mood, and physical health for a bit. Essentially, you’ll feel better, lighter, and stronger once the spell’s in place – but it only works for a short time.

This spell isn’t intended for lengthy protection. It’s powerful, but it’s mostly geared towards needing that extra bit of protection on the go. So if you’re about to head into a job interview or on a date, this is a great spell to choose. It usually lasts as long as the sunlight does (although, there is some lingering protection affect that go one for something like 12-20 hours after the spell’s cast).

What you’ll need:

  • Sunlight

Stand in the sunlight, feet firmly planted and about shoulder width apart. You should be at least an arm’s distance from everyone else.

Tip your head slightly up, so you feel the sunlight on your face, but not so upwards that you can’t see in front of you. Spread your arms out wide in a fast but confidence motion, holding them there for the length of this spell.

Envision yourself being bathed in the warm sunlight. If vision work isn’t for you, know that you’re already in the sunlight, so just focus on feeling the warmth of the sun on your face.

Now say the following:

I embody the sun

Touch me and you shall burn.

My power is magnified

Be gone all that would harm me,

You are denied.

Take a moment to let the sun soak into you, then go about your day.

This spell can be subtly done while stretching.


Patreon | thiscrookedcrown.com

Advertisements
Advertisements
Advertisements
Advertisements
Advertisements


Key Home Hunting Spell

This spell is great if you’re looking for a house, apartment, or somewhere new to live.

It might take a little doing to find the spell ingredients, so prepare in anticipation of needing to do the spell.

Remember to scroll to the bottom for additional notes!

What you’ll need:

  • Keys
  • Symbolic representation of the emotions you want to have in your home (ie, happiness, safety, etc)
  • A list or description of what you need and want in your home, including your budget range.
  • Enchanted water (any kind you want)

Go out and find some old keys. An antique store or used goods store probably has a good selection. If not, try online – they’re often used for crafts and you can buy a bunch of them on etsy, ebay, or a similar location.

The keys should, ideally, be of different styles and era and should be house or building keys rather than lock, car, or prop keys. Skeleton keys are fantastic for this.

Once you’ve got your keys, wash them. They don’t need to be polished, but a quick wipe down with some sort of enchanted water is idea. Sun water, full moon water, new moon water, holy or blessed water, lucky water… whatever feels right for you. If you don’t have any preference, use sun water.

Now cleanse the keys. You want to remove any negative energy and specific location ties a key has. If you have a key to a place you want (like an old key to a building you want to live in), don’t cleanse it except to remove negative energy. Once cleansed, empower the keys with positive energy, priming them to find opportunities for you.

Now that your keys are ready, make up your list of needs and wants for your home. Make sure you differentiate between your actual needs and wants. You need at least three bedrooms for you and your roommates or family, but you probably don’t need a fireplace.

Needs to consider:

  • Location (specific neighborhood, commute time, or nearby certain locations or features, like park)
  • Number of bedrooms and bathrooms
  • Accessibility (stairs? elevators?),
  • Parking or public transportation access
  • Inclusion of utilities and estimation of those utilities
  • Pet-friendly (pets accepted, yard for the dog, etc)
  • School district
  • Additional necessary spaces like a home office
  • Budget range

Wants will be everything else. Here’s other things to consider:

  • Amenities nearby (maybe a public swimming pool isn’t necessary, but you’d really like it)
  • How much sunlight it gets
  • How noisy the area is
  • Yard or garden
  • How many plugs / how much electricity the home can take (important if you have a lot of electronics)
  • Landlord’s management skills, policies, friendliness, and rent payment options
  • Walkability of the neighborhood (ie, Are there sidewalks? Busy streets? Well-lit? Can you take your dog for a walk without having to dodge cars?).
  • Friendliness of the neighborhood
  • Features of the home that probably aren’t essential, such as a balcony, fireplace, luxury kitchen, and so on.

Try to be relatively reasonable here. You’re probably not going to be able to find a mansion with several acres, an indoor pool, and all for half of your budget. I mean, you could; shoot for the stars, but don’t plan on it happening.

Once you’ve got your list written out, find an object that represents how you’d like to feel in your new home. Maybe it’s a picture of you and your friends having a great time on board game night or the platter you use at every family meal. It can even be an image of an apartment or home you like or a tarot card (such as the Ten of Cups).

Once you’ve assembled everything, take the object representing your emotions and place it on a table or counter that you actually eat dinner at the most. (So maybe the coffee table rather than the dining room table if you tend to eat dinner on the couch).

Place the list of wants and needs on top of the emotional object. Place a key on top of the list and infuse the key with energy to draw opportunities that fulfill the list and emotional object to you. Repeat this process with each key.

Now put the keys on a key ring and add it to your keys. If this is too heavy or bulky for you to put on your actual key ring, at least carry the keys with you whenever you leave the house.

When you find a place you like, pick one of the keys that feels “right” and mime opening the front door of the place with the key. This may be difficult to do with any level of subtly. If you don’t think you can pull it off, you can do the action with any door. You could also try turning the key in your pocket, stroking the key saying (aloud or silently) that this home will be yours, or even just imagine a specific key opening the front door of the key.

Try not to use the same key for different places. The idea is that you’re temporarily tying the key to that location. Repeating the spell with the same key can muddy the waters.

When you get a place, you can retire the keys. Hand the keys on a wall by the door, with the key that represented the home first on the key ring. Charge the keys to now bring opportunities to you of all kinds (such as financial) and to protect your new home.

Note:

  • You can do this as a batch process, but I find the individual charging of the keys leads to a better result. Each key will seek out slightly different things rather than the same thing, allowing you to find many options to choose from. Your results may differ though, so give it a try both ways, if you want.
  • It’s actually not super great to have a keychain loaded with lots of keys and things. The weight can affect locks and the ignition of your car if it’s excessive. So if you think the weight of the keys is too much, then just carry it with you when you leave the house.
  • If you don’t have a key ring (ie you have keyless entry into your home and don’t have a car), carry the keys anyway.
  • Ideally, you shouldn’t cleanse the keys after the spell’s done and you have your place. You should be able to twist the charged energy inside the keys to the new purpose of bringing opportunities and protecting the home. If energy manipulation of this level isn’t your thing, you can cleanse and charge them with your new purpose.
  • This spell uses a lot of energy manipulation. You can substitute the energy manipulation with a verbal verse or silently telling the keys what you want to happen. It works the same.


Patreon | thiscrookedcrown.com

Advertisements
Advertisements
Advertisements
Advertisements
Advertisements


Witchcraft 101: Adapting Spells

It’s a rare magical practitioner that hasn’t had to adapt a spell at one time or another. Usually it’s for personal practice reasons or ingredient reasons, but it can simply be that it’s too cold to walk outside or they just don’t like the spell’s steps or wording.

Adapting spells can be really easy – but it can be a challenge too. It’s okay if it’s a challenging or daunting task for you! It really is. Spell casting is a lot like cooking and baking; for some people, it’s easy to moderately okay and for others, it’s a daunting task.

Cooking and baking are relatively subjective. Things need to turn out a certain way to be properly edible and taste good, but not everything is going to taste great to the same people. Spells are a lot like that. There are some things that just won’t work quite as well for you as for others and some ingredients (like some foods) that you just don’t want to work with.

Like a recipe, there’s a way of approaching a spell that you need to adapt. Here’s how.

Step One: Read & Analyze

Read through the spell completely, including any notes the author or other practitioners may have made. Take notes yourself as needed, marking what things you’d need to purchase or procure in some manner. Also know any timing events that need to be marked on your calendar (such as the next full moon).

If you plan on making any adaptations, write it down clearly. You’re swapping this ingredient for that. If you don’t know what ingredient to swap something for, then you need to really sit down and analyze that spell. What purpose does that ingredient serve in the spell? If you can’t see an obvious reason, it’s probably best to assume it’s there for a correspondence reason. To help with that, check out correspondence charts.

How this compares to a recipe: When you make a new dish, it’s always a good idea to read through the recipe. It may need a special pan you don’t have or an ingredient that’s not listed in the ingredient list above. It may need the butter or eggs to be room temperature or it could be the baking is thrown off on cold days. There may be a reason that ingredient is specific to the recipe – without it, the puff pastry won’t rise or the chemical reaction you need for the yum factor doesn’t happen. Research helps mitigate this before you’re elbows deep in ingredients and realize you’re up a creek without a paddle and a storm is brewing on the horizon.

Step Two: Double check that you have everything

There’s little reason to try a spell or recipe when you’re missing half the stuff – it’s not the same thing at that point. You may be able to create something wonderful, but it’s a brand new spell or recipe. Not the same thing. That’s not a bad thing! Just make sure you write it down. But if you’re intention is to cast a specific spell, be cautious of exchanging too many ingredients or you’ll wind up with something different than the original intention.

That being said, I’m firmly in the camp of winging it. If you want to try and spell and need to adapt it, do it. Take notes on what you’ve changed (in case it works better than the original spell or goes terribly wrong), but try it anyway.

Step Three: Make your changes

Now’s the time for the adaptations. You’ve taken your notes and you have a good idea of what you want to do. Now to make the changes.

The first stop in adaptations is to a correspondence chart or list of some kind. I have one available here, which is sourced and ever-growing.

Sometimes swapping an item can be easy. You need something to represent luck, well, here’s four other herbs that do exactly that. When things have symbolic meanings or magical correspondences, they can often be easily swapped.

But not always. If you really want to be diligent, a quick google search with the ingredient plus something like “folklore” or “magical correspondence” can lead you to why that ingredient is considered lucky. This may be critical at times. Sure, an herb might be lucky, but only for gamblers. That isn’t going to help too much when you want luck taking an exam.

You also have to be aware of herbal associations. Some spells, especially the edible kind, have herbal combinations meant to do something actually physical to the body. It’s not symbolic in meaning, but science. So you can’t just swap in something with a magical correspondence when the concoction is herbal medicine in nature. Plus, herbs can be dangerous – they can counter to one another, they can react with medication or current medical conditions, and they can be toxic. So you have to be very careful when doing something that’s meant to be consumed.

Now for some people, they stay away from herbalism and stick with magical correspondences only. That’s perfectly okay! But be aware that many herbal connections come from herbalism. Even the weird ones. So knowing why something has that association may be important.

And none of that may matter at all. People can work intuitively with ingredients and make up their own correspondences and associations. That’s a great way to go about it too.

You also have to consider the purpose of the item in the spell. Swapping a red candle for a white one is easy since white is seen as a universal color or something of a blank slate. But when you start thinking, “well, I don’t think this makes a good candle spell. What if I skip the candle?” And for some spells, you can absolutely do that. The candle is superficial or is being used as a focus object (ie, something to look at and hold) For others, the candle is being used as a conduit (ie, the spell verse might have “as this candle burns”) or the candle has a practical purpose (ie, burning a piece of paper with writing on it). It’s harder to swap out items that are practical or are a conduit.

In short, there can be more to adaptations than just “this is the ingredient on the list that I have”.

Step Four: Do the spell

Go for it. Just try the spell. When you’re casting, you may need to change things up on the fly. Maybe the candle won’t stay lit or your neighbor is being nosy. Maybe the dog starts barking because she needs to pee or your phone goes off non-stop with notifications. Sometimes the wording is just plain weird and doesn’t work for you.

Adapting on the fly happens. Finish the spell. Even if you lose momentum or the build up of energy. Even if you feel rushed, judged, or things get weird. Finish your spell. Not finishing it can lead to weirdness and energy drains, at the least.

Use the words that work best clearly for you. Yeah, that old timey wording looks great, but if you’re not feeling it, use your plain ol’ normal words instead. Speak or think honestly and clearly when you need to make wording changes.

Step Five: Record

You’ve been taking notes all along. Now record what happened. How’d the spell casting go? Over the next few days and weeks, you’ll probably begin to see results. What are they? How do they meet your expectations? Do you think your adaptations changed how the spell worked?

As you progress with your practice, you may find that you don’t want to, need to, or like to write things down. I’ll be honest, as someone who spends a LOT of my time writing, I rarely write down the spells I routinely do or do off the cuff unless it’s really good. Mostly, I write down stuff I’m tinkering with. That’s my personal preference. You don’t need to have meticulous records, but they very much help.

I know a lot of this advice sounds like “just write it down!” and, honestly, keeping notes as a beginner can be really key. I am well-known for winging it in just about all my personal spells, but I take notes for myself on spells I’m working on. It can really help, especially when you’re doing an important working or you’re making adaptations.

Hope that helps! Happy casting!


Patreon | thiscrookedcrown.com

Advertisements
Advertisements
Advertisements
Advertisements
Advertisements


Thrown Stones Divination Spell

If you’re looking to make some changes in your life, this spell can help. It’s ideal if you think you know about the changes you want to make, but you’re still not wholly certain. It’s especially good for when you have a few options that would be nice, but you’re not sure which path is best for you.

This is partially a divination spell, so pay attention to any additional signs, weirdness, or feelings you get along the way.

Make sure to scroll to the bottom for spell variations!!!

What you’ll need:

  • Stones
  • A crossroad with low or no traffic
  • Marker or paint (optional)
  • Notebook and pen (optional)

First gather up some stones. Pick a stone for each path or change you want to make. This stone can be something you select because it reminds you or inspires you of the change you want to make. It could just feel “right”.

Optional: You can charge each stone with the change or choice you’d like to make. You can also name each stone instead or even write the change you want on the stone in marker or paint. This is optional, but it can make the spell feel more “set”. If you’re doing the spell on a whim or spur of the moment, don’t worry about the writing or energy charging bit.

Once you’ve gotten your stones, go somewhere where the crossroads aren’t used often. This might be a street corner late at night in a quiet neighborhood or it might be a path that splits in your local park. You don’t need long, but you don’t want someone to walk by when doing this.

Stand slightly on the path you’ve come from and face the different directions the crossroad takes.

Put the stones in both hands, hold them to your heart, and speak about the change or path that you now want to make. Depending on what the exact circumstances of the spell is, you may need to work out your phrasing. Speak from the heart. A good example is:

"Change is needed
And I am changing
But what direction should I turn in?
What should I focus on?
Where do I go?"

When done speak, throw the stones out away from you towards the paths before you. Path attention to your feelings here. Is there something that you thought of as you threw the stones? Some choice or decision that you hoped would happen? If so, that’s probably the change you really want and should you keep that in mind, no matter what this spell divination says.

Now take the time to go and look at what stone landed where. Your notebook and pen will be useful for this. Pay attention to where the stone landed. Is it directly on the path or off to the side? Did you lose it? Which ones drew your attention first. Did they land writing side up or down, if applicable. What plants are they surrounded in? Did it take damage or break? Where do those paths lead? Are there people in that direction or just trees and sky?

Generally speaking, if a stone is broken then assume that the change or choice isn’t a good one. If a stone lands directly on the path, then that’s probably a clearer, better, or easier change to make. Look to see what the plants around it might mean. If the rock lands writing side down, then you might need to go through some drama to achieve that change.

This is largely going to depend on your personal interpretation and symbolism. This is where skill in divination may be helpful, but trust your instincts.

That being said, if you’ve marked the stones, you don’t need to dig super deep if you don’t want to. Just pick whatever one landed on the path at all or the path you’d like to see and go.

Now that you have your answers, you can make those changes or choices.

Spell variations:

Variation 1 – Gemstones: This spell uses common garden stones or rocks in the spell. But you can use polished stones, gemstones, or crystals if you’d prefer. This gives you a wider option to pick something that’s more suitable magically, energetically, or in some other sort of meaningful way.

Variation 2 – Small Objects: You could instead pick small objects that represent the change or choice you’d like to make. This could be a small toy, a pen, or decorative object.

Variation 3 – Spell Objects: For each change or choice you’d like to make, you can create an object from herbs and other magical ingredients to represent this. You can simply put the ingredients in a coffee filter and tie that off or you could do something a bit more elaborate and use a homemade salt clay or similar and roll it in herbs.

The benefit of any of these variations is that you can tailor the energy and power of the spell even more. This will largely depend on your personal practice, but it’s something to think about.

The risk is that you may damage or lose the stone, crystal, or whatever in the process of casting this spell, so make your choices with that in mind.

Notes:

  • If you have many stones, write down how many stones you have and what they represent before you throw them. This way you can track which ones you’ve lost or need to find.
  • Hiking or walking trails are pretty much perfect for this spell. Not only will be outside with your thoughts, but you also can collect the rocks on your walk there.
  • Go as organic or nature-friendly as possible here. You may not be able to recover the object you’ve thrown and having something bio-degradable is important, if you’re using something other than a rock.


Patreon | thiscrookedcrown.com

Advertisements
Advertisements
Advertisements
Advertisements
Advertisements


Glimmering Moon Beauty Spell

This is a simple beauty spell, channeling the moon as your source of beauty inspiration. This spell requires a whole month of set-up and dedication, then repeats once a month for as long as you’d like to use the spell.

What you’ll need:

  • A small mirror, preferably round
  • A bowl large enough to fit the mirror into
  • Full moon water
  • A full moon’s cycle

Find a place where the moonlight directly hits that spot. This may take some doing, but keep at it until you find one where you can have some privacy.

On a full moon night, dress yourself in your favorite or best outfit. The one that makes you feel the best, most beautiful, handsome, attractive, sexy, etc. Go as extreme or as simple as you’d like.

Place the mirror in the bowl then pour the full moon water. Bend so you can see your face in the mirror and the full moon above you at the same time. Now say,

"Beautiful moon
My beauty becomes like you
Glowing, glittering, shining in the dark
As you fade, my flaws fade
As you grow, my beauty grows."

Wash your face with this water. This is a good time to also bring in your own affirmations or meditations.

Repeat this same spell every night as the moon wanes, focusing on the flaws fading part. At the new moon, make sure you’re dressed as you were on the full moon and repeat the spell again. As the moon waxes, repeat the spell and focus on the beauty growing. On the full moon, repeat your outfit and the spell. This sets the spell up. You can repeat the spell on each full moon to keep it up.

Notes:

  • This spell requires a specific location that can be difficult to find.It may not be doable in your climate or location. The whole point is to channel the moon’s beauty, so try to find a good spot.
  • The spell requires the full moon cycle and an entire month’s worth of work. If this is difficult due to weather or simple time demands, then simply do the spell on the full moon, at least once during the waxing and waning, and the new moon. That should only be five times.
  • Pocket-sized mirrors and baking dish are perfect for this.
  • Save the full moon water, if possible. Make sure to check it out before casting the spell each time, in case it gets gross for some reason.
  • This spell is demanding on full moon water, so make sure that you’re stocking up on it too.


Charmed Meeting Attention Spell

This spell is intended to introduce you to someone or at least meet someone new. It can be used when you want to make a good impression or it can be used just so you meet someone during the day. It’s not a love spell, exactly, more of a “hey, pay attention to me” kind of spell.

The results may lead to a date or future friendship, but it may also mean that you have an uplifting conversation with a co-worker or you meet someone inspiring at the coffee shop. It may mean someone talks to you on the bus or your neighbor says that you look cute today. The results vary and what you get may not be what you’re looking for. Still, it’s useful if you’re feeling a bit lonely or need help breaking out of your shell.

What you’ll need:

  • Full Moon Water
  • Sunshine Water
  • Mirror
  • Scented infused waters (optional) (see notes!)

Pour the sunshine and full moon water together in a bowl. Add the scented liquid, if you’re using one.

With your pointer finger, make an infinity sign (sideways 8), stirring the water. Envision or speak your intentions of meeting someone and making a great impression. Channel your favorite flirting style or picture that movie-perfect chance meeting.

As you do this, smile and look at yourself in the mirror. Touch the water to your lips and say,

My smile charms those who see it
My voice draws them closer to me
My words entice them to my side
Like the sun and moon shine
So will I.

Now dab the water behind your ears, on your eyelids, middle of your forehead, underside of your jaw, and anywhere else you might like someone to look at. An example would be along your collarbone, joints of your wrist, or anywhere else. Repeat the above verse as you go.

The spell works passively, but when you wish to invoke the spell specifically, catch your reflection in something and smile. You might be just smiling to yourself, but the spell should be working double time now.

Notes:

  • Sunshine water is simple water left to sit in pure sunlight for a while, just like full moon water is water left to soak in full moonlight.
  • Infused scented water can be a difficult thing. Rose water or lavender water are ideal here, but they can be strong. You can make your own, if you prefer.
  • You can also use essential oils (but make sure you’re using a carrier oil too!) Perfume or cologne could also be subbed in, but make sure that you don’t get these things in your mouth.


Heart Weave Love Spell

This spell is to draw a lover to you, someone who will love you and you’ll love them, and carries specific qualities you desire in a partner. It’s definitely an arts-and-crafts sort of spell, but useful if other spells of a similar style haven’t worked for you yet.

What you’ll need:

  • A piece of bendable metal
  • String, ribbon, yarn, etc.
  • Pliers (optional)
  • Sewing needle (optional)
A piece of wire and string is all you need, but a needle and pliers can can!
Bending the wire into an acceptable heart shape is only the beginning. Note the flat ends at the bottom, making it easier to twist the ends and close the heart.
A heart made by twisting the ends of the wire. This might need a little muscle provided by the pliers. You may also need to reform the heart as it might have been bent out of shape while you were working.

Bend and shape the wire into a heart, twisting the wire together say,

"This is our foundation
Our mutual desire for love
And the love that we find in each other."
Tie the string to the bottom where the wire is twisted and bring the wire across the center of the heart, tuck it over the edge and then pull the string through the center, laying it across the top of the side of the heart.

Now, take a strand of string and tie it to where the wire is twisted together. Spread the string over the surface of the heart, crossing it over. Wrap the string over the metal and then push it through the center and cross it to another edge. Repeat.

Here the string has been tucked around the edge of the heart, pulled through the center again, and pulled across the heart to the opposite side. A new piece of string is tied on since the other one was at the end of the line.

When the string runs out, tie a new piece to the end of the string and just keep on going.

With the new string added, tuck the string around the edge of the heart and pull through like before, bringing it back to center.

As you work, list qualities that you would like in your future partner. You can just simply list them or add any kind of spell work you’d like here. This is where you get to customize the spell to your taste and to draw the kind of lover you’re looking for.

Repeat the qualities you’d like in your partner if you run out of ideas.

With the new string added, tuck the string around the edge of the heart and pull through like before, bringing it back to center.
Here the string is brought around the edge to the front, then crosses the heart’s center, weaving in and out of the strings it crosses, finally resting over the edge of the heart.
The string is tucked under the metal, pulled through the center, and crosses to a new part of the heart to begin the same kind of steps again with a new piece of string.

When the heart is full of string, use the last bit to weave the working end into your heart.

Once done, place the heart in a window facing the street. It doesn’t have to be in full view of others, but it should be located in the window. As you place it say,

"Here I place you
Where my message may take flight
And the love I put into you
Will bring a lover to my side."

Notes:

  • Floral wire is really easy to use and obtain. You might even be able to get some at a local dollar store or similar location. Wire is also available in various colors, so you may be able to purchase something that’s closely aligned to color symbolism for you.
  • Yarn, embroidery thread, or ribbons are great for this. Use color symbolism to get the look you want in the spell or use color symbolism to indicate the emotions or attributes you want.
  • It might be easier to do this spell if you have an active knowledge of weaving, because even though this is basic, it can be hard to get everything taunt and pretty. If you aren’t concerned about this, then don’t worry about it.
  • It’s also useful to use a sewing needling in later stages of the spell, as it can be difficult to push through the string later on.